
There are multiple scenarios where you’d need to get the text contained in a picture. For example, when you see a detailed infographic or a poster with words that can be useful for your next project.
However, many don’t know the hidden trick of converting images to text form. And that’s why we’re here with this post to show you this process using Python language.
By the end, you’ll be able to extract text from pictures and make it perfectly editable for your productivity tasks. So, let’s get started.
Process of converting pictures to text form using Python
Below, we’ve outlined the entire process of converting images to editable text using Python scripts. Follow each step closely to avoid missing out on anything.
1. Install an appropriate IDE
The first prerequisite to start the conversion process is to download and install Python’s latest version to your device. As of now, the latest package is 3.12.6 and can be accessed from the official website.
After you’re done with this, proceed to install an appropriate IDE on your device. IDE stands for Integrated Development Environment. It is usually software that one can install to run, build, or save Python scripts with required formatting.
Using IDEs is beneficial for both amateur and professional coders. The software provides features like auto-completion of codes, interactive workspaces, highlighting of syntax, debugging tools, and more.
There are many options available on the internet for a suitable IDE for the conversion process. However, we’ve listed some of them below:
- Atom
- Spyder
- VSCode
- Sublime Text
- And so on …
For this post, we’ll show the procedure with Atom Editor, Windows 10 64-bit version. Choose the OS version of the respective IDE according to your device.
2. Get the required libraries
To convert a picture to text form, you mainly require two Python libraries:
- Pillow – for image processing
- Pytesseract – for OCR
The pillow library often performs functions like converting images to grayscale, adjusting contrast, etc., (more details later.)
On the other hand, Pytesseract is the OCR engine made by Tesseract for Python. It is the primary library responsible for making picture text editable through some pre-defined functions.
The installation of the libraries is very simple. Open Command Prompt with Administrative privileges. Type in the command:
“pip install pillow pytesseract”
Press enter and wait for a few seconds to let the installation of the libraries complete. After that, check if you’ve got the latest version of the library by reading the provided notices.

Since we were prompted to get the newer version, we put in the command mentioned in the above image to get all set for the conversion process.
3. Set up Tesseract on your computer
For the next step, hop on to the GitHub page to install the Tesseract.exe file on your computer. This is important as the batch file will later get attached to the Pytesseract library installed earlier, making the conversion process a lot easier.
Simply, install the .exe file from here. During the installation process, add the software to the system PATH. This will ensure that you can access Tesseract from the command line.
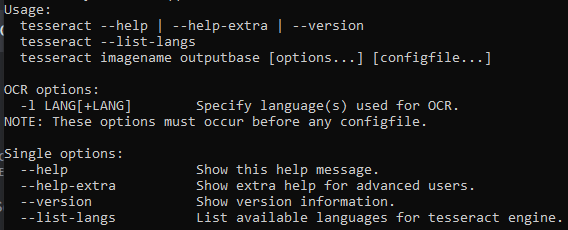
Finally, test if the set-up was successful by going to the command prompt and writing the keyword ‘tesseract.’ If you get the following response, means you’re good to go.
If not, refer back to the guidelines above and try installing the libraries or the Tesseract .exe file again.
4. Get ready with a suitable image
When we say suitable, we mean it. The picture with the text must not be unusually distorted, tilted, or too bad with contrast.
The focused area in the image (or the text) must be visible to the naked eye; the idea is to make the process as fluid and accurate as possible. Sure, the algorithms at the backend are strong enough to deal with images with low resolution and bad tilts. But why take the risk?
For our experimentation, we used a simple, black-and-white picture that had dummy text written on it. Below is the screenshot of the .jpg file.

Again, we’ve kept things simple on purpose, but this doesn’t mean that this process is incapable of any advanced type of textual data. Experiment with the provided steps and explore the options on your own.
5. Write the Python code
The last step before getting the results is to write a fitting Python code to run the entire process. Below is the screenshot of the script we wrote for our project.
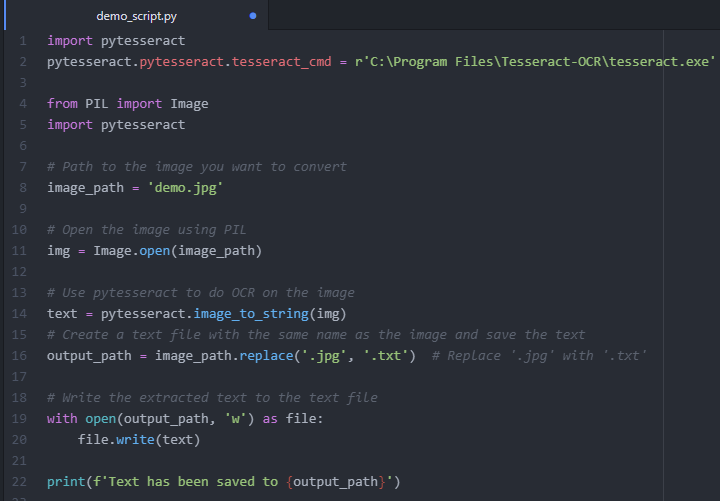
An important detail here is that the demo.jpg and the demo_script.py files are both saved to our C -> Users -> Desktop directory.
So, if your image and Python script files are stored in separate directories, then you might need to edit the ‘image_path’ variable in the above code. However, we recommend to keep both these files in the same folder for your ease.
Moreover, the script saves the output as a .txt file within the same directory as the Script and picture files. This is helpful to access the content in the pictures in editable, updatable, and storable form.
6. Extract results
Alas, we’re ready to run the script in the command prompt (CMD) and conclude the picture-to-text conversion process.
Reminder: If you’ve recently opened CMD on Windows, you might want to change the directory to where your script file and the desired picture are located. Use the following command.
“cd path/to/your/image/Python Script/directory”
After you’re done changing the directory, you’ve to prompt one last command before you can get the text form of the picture.
“Python yourfilename.py”
As we entered this command, we got the success message in the command prompt saying, ‘text has been saved to demo.txt.’ This indicates that everything went smoothly in the process.
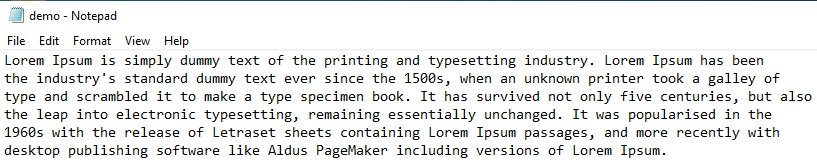
You must remember that our picture is named ‘demo.jpg’ so the code will give the text file according to the image’s name. Below is the result we got:
We used a JPG file for the conversion process, however, you’re free to choose between a JPEG or PNG format, too.
An alternative method
There is an alternative method to do the above process without any hassle. That is to leverage an online picture to text converter.
This tool leverages the same Python APIs we mentioned before, but it is a more viable option for day-to-day use. It automatically makes your pictures into text documents without needing any manual input.
Thus, the converter saves a lot of time and effort, while providing highly accurate results. As an example, we’ll use the same demo file that we utilized with the Tesseract engine. Let’s see the results we got:
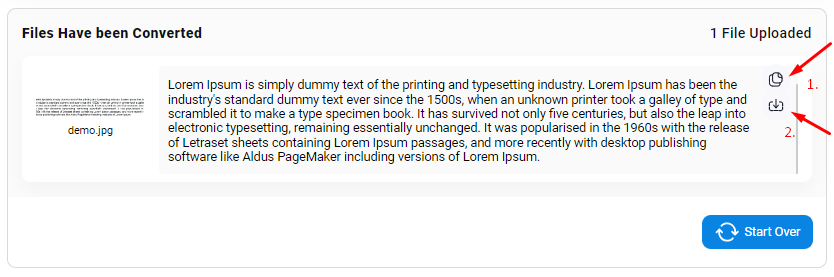
Indeed, the output is valid, making this converter an easier-to-operate option for common users. Later, you can copy the text using the clipboard option (1st arrow) or download the .txt file using the given button (2nd arrow.)
And that is pretty much it! This alternate method serves as a quick way to convert pictures to text using a pre-built, robust Python development. Nonetheless, you can always dabble with the steps we mentioned above to create your very own converter.
Final words
In this post, we have provided a detailed guide on how to convert pictures to text using Python.
The steps for the process included installing the required libraries, setting up Tesseract, and writing a Python script.
Additionally, an alternative method of using an online picture-to-text converter was presented as a quicker and simpler option for everyday use, providing accurate results with minimal effort.