Deep Learning (DL) techniques have changed the field of computer vision significantly during the last decade, providing state-of-the-art solutions for classical tasks (e.g., object detection and image classification) and opening the doors for solving challenging new problems, such as image-to-image translation and visual question answering (VQA).
The success and popularization of DL in computer vision and related areas (e.g., medical image analysis) has been fostered, in great part, by the availability of rich tools, apps and frameworks in the Python and MATLAB ecosystems.
In this blog post, I will show how your team can use both MATLAB and Python effectively and provide an easy-to-follow recipe that you should allow you to leverage “the best of both worlds” when building computer vision solutions using deep learning.
Background
Python is a programming language created by Guido van Rossum in the early 1990s. It has been adopted by many data scientists and machine/deep learning researchers thanks to popular packages (e.g., scikit-learn) and frameworks (e.g., Keras, TensorFlow, PyTorch).
MATLAB is a programming and scientific computing platform used to analyze data, develop algorithms, and create models in a variety of fields of science and engineering. It has a successful history of widespread adoption by engineers and researchers in industry and academia. It features many specialized toolboxes which encapsulate relevant algorithms, interactive tools, and rich examples in areas such as machine learning, deep learning, image processing, and computer vision (to mention but a few). MATLAB also has a vibrant community of users who contribute additional functionality (including apps and entire toolboxes) and a growing presence in popular code-sharing repositories such as GitHub.
In my personal experience, I have used both MATLAB (for 25 years and counting) and Python (for less than a decade) in different research projects, classes, bootcamps, and publications, mostly in the context of image processing/analysis, computer vision, and (more recently) data science, machine learning, and deep learning.
I have also worked with multidisciplinary teams who adopt a variety of tools and are well-versed in diverse skill sets. I know how important it is to promote and facilitate the adoption of a streamlined and well-documented deep learning workflow. I am also a strong proponent of always using the best available tools to get the job done in the best possible way. Fortunately you can use the two languages together, which we will show next.
Context and scope
The interoperability of MATLAB and Python has been extensively documented in videos, webinars, blog posts, and the official MATLAB documentation. These resources can be extremely valuable when learning how to call Python scripts from MATLAB and vice-versa.
Some of the main reasons for calling MATLAB from Python can be motivated by the need to:
- Promote code integration among team members and collaborators using different frameworks and tools.
- Leverage functionality only available in MATLAB, such as apps and toolboxes (including third-party ones contributed by the MATLAB community).
In this blog post, I focus on integrating MATLAB apps into a Python deep learning workflow for computer vision and image analysis tasks, with emphasis on the data preparation stage of the traditional deep learning workflow (Figure 1). More specifically, I show how your team can leverage the rich interactive capabilities of selected MATLAB apps to prepare, label, annotate, and preprocess your data before using it as the input to your neural network – and everything else that follows in the traditional deep learning pipeline.

Figure 1: Basic deep learning workflow.
I will assume that: (1) you have a deep learning pipeline for computer vision in Python that you plan to adapt and reuse for a new (set of) task(s); and (2) the images associated with the new task(s) will require interactive actions, such as annotation, labeling, and segmentation.
The basic recipe
Assuming that you have MATLAB installed and configured in your machine and your favorite Python setup (e.g., using Jupyter notebooks), calling MATLAB from a Python script is a straightforward process, whose main steps are:
- (In MATLAB) Install the MATLAB Engine API for Python, which provides a Python package called matlab that allows you to call MATLAB functions and exchange data between Python and MATLAB.
- (In Python) Configure paths and working directory.
- (In Python) Start a new MATLAB process in the background:
import matlab.engine
eng = matlab.engine.start_matlab('-desktop')
- (In Python) Set up your variables (e.g., path to image folders).
- (In Python) Call a MATLAB app of your choice (e.g., Image Labeler app).
- (In MATLAB) Work (interactively) with the selected app and export results to variables in the workspace.
- (In Python) Save the variables needed for the rest of the workflow, e.g., image filenames and associated labels (and their bounding boxes).
- (In Python) Use the variables as needed, e.g., processing tabular data using pandas and using image-related labels as ground truth.
- Repeat steps 3 through 7 as many times as needed in your workflow.
- (In Python) Quit the MATLAB engine:
eng.exit()
An example
Here is an example of how to use Python and MATLAB together for two different tasks within the scope of medical image analysis (using deep learning): skin lesion segmentation and (medical) image (ROI) labeling.
Despite the differences among them, each task follows the same basic recipe presented earlier. The specifics of each case are described next.
Task A: Skin Lesion Segmentation
The Task: Given a dataset of images containing skin lesions, we want to build a deep learning solution for segmenting each image, i.e., classifying each pixel as belonging to either the lesion (foreground) or the rest of the image (background).
The Problem: In order to train and validate a deep neural network for image segmentation, we need to input both the images as well as the segmentation masks (Figure 2), which are essentially binary images where foreground pixels (in this case corresponding to the lesion) are labeled white and background pixels are marked as black. The job of the network is to learn the segmentation masks for new images.

Figure 2: Skin lesion segmentation: input image (left); binary segmentation mask (center);
segmented image, with green contour outlining the lesion area (right).
The basic workflow usually consists of using convolutional network architectures, such as U-net and its variations, for which there are multiple examples of implementation in Python and MATLAB. A crucial component of the solution, however, is the manual creation of the binary masks needed for training and validation. Except for a few publicly available datasets, this time-consuming and specialized task must be performed using a powerful interactive tool.
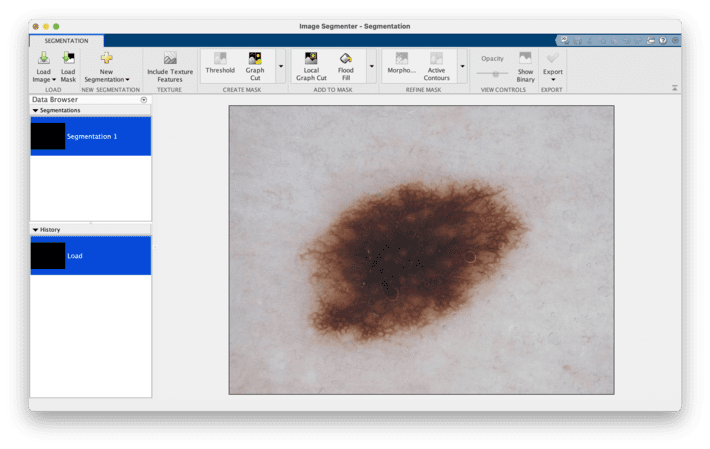
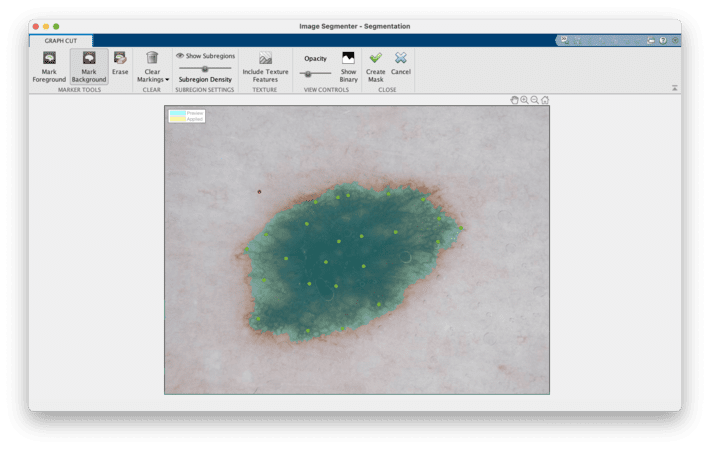
The Solution: Use the MATLAB Image Segmenter app to create the binary masks and leverage the existing (Python, for the sake of this example) workflow for everything else. Image Segmenter allows you to create masks manually and provides several (semi-)automatic techniques to speed up the process and refine the results (Figures 3 and 4). Both the final segmentation mask image and the segmented version of the original image can be exported to the MATLAB workspace and/or saved to disk.

Figure 3: Image Segmenter app: loading an image containing a skin lesion.

Figure 4: Image Segmenter app: result of applying the Graph Cut algorithm after having selected a few foreground control points (in green) and a single background control point (in red). The mask appears overlaid on top of the original image.
Task B: (Medical) Image (ROI) Labeling
The Task: In a similar context to Task A, we want to build a deep learning solution for detecting regions of interest (ROIs) in each image, i.e., placing a boundary around each relevant region in the image. The most common ROI will be a lesion; other possible ROIs could include stickers, ruler markers, water bubbles, ink marks, and other artifacts.
The Problem: To train and validate a deep neural network for ROI/object detection, we need to input both the images as well as the labels and coordinates of the relevant ROIs, which can be expressed as rectangles (most common), polygons, or pixel-based masks (similarly to the masks used in segmentation). The job of the network is to learn the location and labels of the relevant ROIs for new images.
Once again, similarly to what we saw in Task A, a crucial component of the solution is the manual creation of the ROIs (polygons and labels) needed for training and validation. Except for a few publicly available datasets, this time-consuming and specialized task must be performed using a powerful interactive tool.
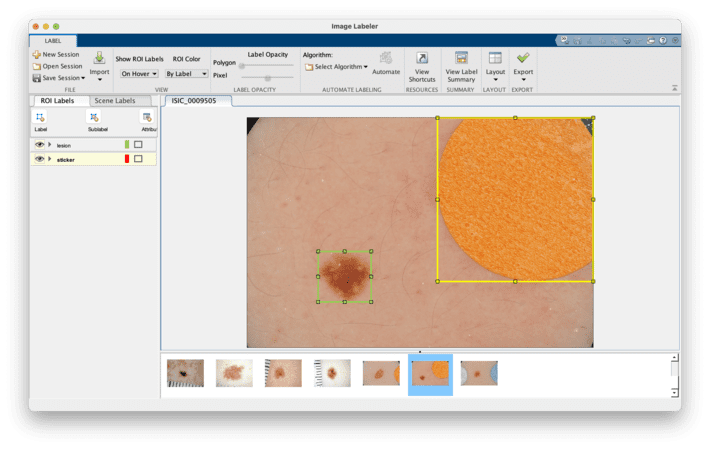
The Solution: Use the MATLAB Image Labeler app to create and label the ROIs and leverage the existing workflow for everything else. Image Labeler allows you to create ROI labels of different shape, assign them different names and colors, and provides several algorithms to help automate and speed up the process and refine the results (Figure 5). The resulting ROIs can be exported to the MATLAB workspace and subsequently used as variables in your Python code (see example on GitHub for details).

Figure 5: Image Labeler app in the context of dermoscopic images containing artifacts.
The selected image contains two rectangular ROIs, labeled as lesion and sticker.
Key takeaways
Deep Learning projects are often collaborative endeavors that require using the best tools for the job, enabling effective code integration, development, and testing strategies, promoting communication, and ensuring reproducibility of code. Your team can (and should) leverage the best of MATLAB and Python while developing your deep learning projects. In this blog post I have shown how to use Python and MATLAB together for a few tasks related to computer vision and medical image analysis problems.
Integration of Python and MATLAB goes significantly beyond the scope of this blog post; check out the resources listed below for more.
Learn more about it
This blog post was inspired by recent blog posts by Lucas García and a series of great videos by Heather Gorr, Yann Debray, and colleagues. I strongly encourage you to follow them and check out their very informative examples and tutorials.
If you’re interested in other aspects of the deep learning workflow, these are some blog posts in which I:
(a) discuss the entire process (including often forgotten steps) in greater detail;
(b) show how to use a low-code app in MATLAB, the Deep Network Designer, for…; and
(c) teach you how to manage and track multiple deep learning experiments with different network architectures, hyperparameters, and other options. Check them out!
