

Since the seminal paper Attention is all you need of Vaswani et al, Transformer models have become by far the state of the art in NLP technology. With applications ranging from NER, Text Classification, Question Answering or text generation, the applications of this amazing technology are limitless.
More specifically, BERT which stands for Bidirectional Encoder Representations from Transformers leverages the transformer architecture in a novel way. For example, BERT analyses both sides of the sentence with a randomly masked word to make a prediction. In addition to predicting the masked token, BERT predicts the sequence of the sentences by adding a classification token [CLS] at the beginning of the first sentence and tries to predict if the second sentence follows the first one by adding a separation token[SEP] between the two sentences.
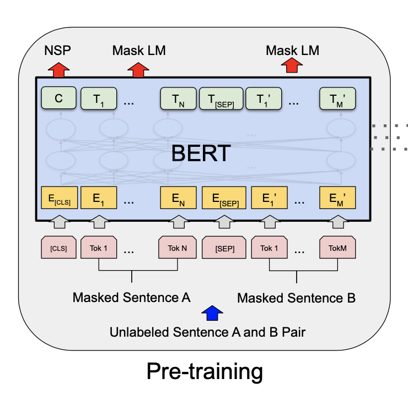 BERT Architecture
In this tutorial, I will show you how to fine-tune a BERT model to predict entities such as skills, diploma, diploma major and experience in software job descriptions. If you are interested to go a step further and extract relations between entities, please read our article on how to perform joint entities and relation extraction using transformers.
Fine tuning transformers requires a powerful GPU with parallel processing. For this we use Google Colab since it provides freely available servers with GPUs.
For this tutorial, we will use the newly released spaCy 3 library to fine tune our transformer. Below is a step-by-step guide on how to fine-tune the BERT model on spaCy 3. The code along with the necessary files are available in the Github repo.
Data Labeling:
To fine-tune BERT using spaCy 3, we need to provide training and dev data in the spaCy 3 JSON format (see here) which will be then converted to a .spacy binary file. We will provide the data in IOB format contained in a TSV file then convert to spaCy JSON format.
I have only labeled 120 job descriptions with entities such as skills, diploma, diploma major, and experience for the training dataset and about 70 job descriptions for the dev dataset.
In this tutorial, I used the UBIAI annotation tool because it comes with extensive features such as:
- ML auto-annotation
- Dictionary, regex, and rule-based auto-annotation
- Team collaboration to share annotation tasks
- Direct annotation export to IOB format
Using the regular expression feature in UBIAI, I have pre-annotated all the experience mentions that follows the pattern \d.*\+.* such as 5 + years of experience in C++. I then uploaded a csv dictionary containing all the software languages and assigned the entity skills. The pre-annotation saves a lot of time and will help you minimize manual annotation.
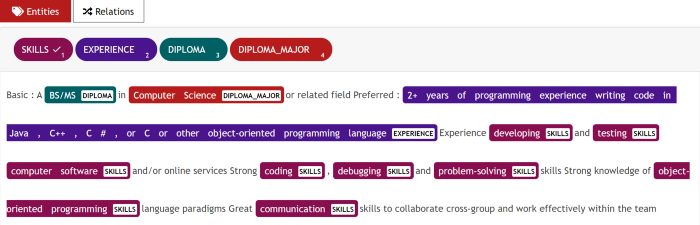 UBIAI Annotation Interface
For more information about UBIAI annotation tool, please visit the documentation page and my previous post Introducing UBIAI: Easy-to-Use Text Annotation for NLP Applications.
The exported annotation will look like this:
MS B-DIPLOMA
in O
 electrical B-DIPLOMA_MAJOR
 engineering I-DIPLOMA_MAJOR
 or O
 computer B-DIPLOMA_MAJOR
 engineering I-DIPLOMA_MAJOR
 . O
 5+ B-EXPERIENCE
 years I-EXPERIENCE
 of I-EXPERIENCE
 industry I-EXPERIENCE
 experience I-EXPERIENCE
 . I-EXPERIENCE
 Familiar O
 with O
 storage B-SKILLS
 server I-SKILLS
 architectures I-SKILLS
 with O
 HDD B-SKILLS
In order to convert from IOB to JSON (see documentation here), we use spaCy 3 command:
!python -m spacy convert drive/MyDrive/train_set_bert.tsv ./ -t json -n 1 -c iob
!python -m spacy convert drive/MyDrive/dev_set_bert.tsv ./ -t json -n 1 -c iob
After conversion to spaCy 3 JSON, we need to convert both the training and dev JSON files to .spacy binary file using this command (update the file path with your own):
!python -m spacy convert drive/MyDrive/train_set_bert.json ./ -t spacy!python -m spacy convert drive/MyDrive/dev_set_bert.json ./ -t spacy
Model Training:
- Open a new Google Colab project and make sure to select GPU as hardware accelerator in the notebook settings.
- In order to accelerate the training process, we need to run parallel processing on our GPU. To this end we install the NVIDIA 9.2 cuda library:
!wget https://developer.nvidia.com/compute/cuda/9.2/Prod/local_installers... -O cuda-repo-ubuntu160492-local_9.2.881_amd64.deb!dpkg -i cuda-repo-ubuntu160492-local_9.2.881_amd64.deb!apt-key add /var/cuda-repo-92-local/7fa2af80.pub!apt-get update!apt-get install cuda-9.2
To check the correct cuda compiler is installed, run: !nvcc –version
- Install the spacy library and spacy transformer pipeline:
pip install -U spacy
!python -m spacy download en_core_web_trf
- Next, we install the pytorch machine learning library that is configured for cuda 9.2:
pip install torch==1.7.1+cu92 torchvision==0.8.2+cu92 torchaudio==0.7.2 -f https://download.pytorch.org/whl/torch_stable.html
- After pytorch install, we need to install spacy transformers tuned for cuda 9.2 and change the CUDA_PATH and LD_LIBRARY_PATH as below. Finally, install the cupy library which is the equivalent of numpy library but for GPU:
!pip install -U spacy[cuda92,transformers]
!export CUDA_PATH=/usr/local/cuda-9.2"
!export LD_LIBRARY_PATH=$CUDA_PATH/lib64:$LD_LIBRARY_PATH
!pip install cupy
- SpaCy 3 uses a config file config.cfg that contains all the model training components to train the model. In spaCy training page, you can select the language of the model (English in this tutorial), the component (NER) and hardware (GPU) to use and download the config file template.
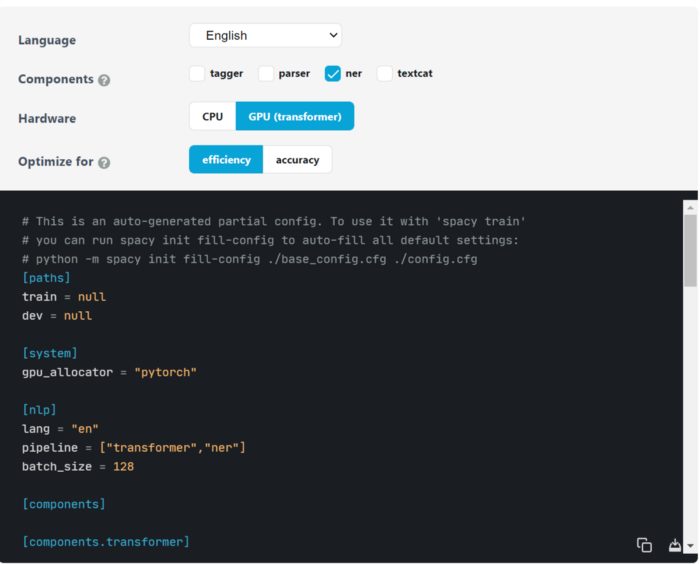 Spacy 3 config file for training. Source
The only thing we need to do is to fill out the path for the train and dev .spacy files. Once done, we upload the file to Google Colab.
- Now we need to auto-fill the config file with the rest of the parameters that the BERT model will need; all you have to do is run this command:
!python -m spacy init fill-config drive/MyDrive/config.cfg drive/MyDrive/config_spacy.cfg
I suggest to debug your config file in case there is an error:
!python -m spacy debug data drive/MyDrive/config.cfg
- We are finally ready to train the BERT model! Just run this command and the training should start:
!python -m spacy train -g 0 drive/MyDrive/config.cfg output ./
P.S: if you get the error cupy_backends.cuda.api.driver.CUDADriverError: CUDA_ERROR_INVALID_PTX: a PTX JIT compilation failed, just uninstall cupy and install it again and it should fix the issue.
If everything went correctly, you should start seeing the model scores and losses being updated:
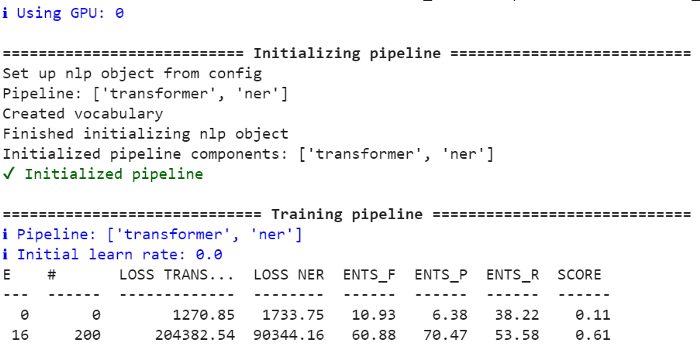 BERT training on google colab
At the end of the training, the model will be saved under folder model-best. The model scores are located in meta.json file inside the model-best folder:
performance:{ents_per_type:{DIPLOMA:{p:0.5584415584,r:0.6417910448,f:0.5972222222},SKILLS:{p:0.6796805679,r:0.6742957746,f:0.6769774635},DIPLOMA_MAJOR:{p:0.8666666667,r:0.7844827586,f:0.8235294118},EXPERIENCE:{p:0.4831460674,r:0.3233082707,f:0.3873873874}},ents_f:0.661754386,ents_p:0.6745350501,ents_r:0.6494490358,transformer_loss:1408.9692438675,ner_loss:1269.1254348834}
The scores are certainly well below a production model level because of the limited training dataset, but its worth checking its performance on a sample job description.
Entity Extraction with Transformers
To test the model on a sample text, we need to load the model and run it on our text:
nlp = spacy.load(./model-best)
text = ['''Qualifications- A thorough understanding of C# and .NET Core- Knowledge of good database design and usage- An understanding of NoSQL principles- Excellent problem solving and critical thinking skills- Curious about new technologies- Experience building cloud hosted, scalable web services- Azure experience is a plusRequirements- Bachelor's degree in Computer Science or related field(Equivalent experience can substitute for earned educational qualifications)- Minimum 4 years experience with C# and .NET- Minimum 4 years overall experience in developing commercial software''']for doc in nlp.pipe(text, disable=["tagger", "parser"]): print([(ent.text, ent.label_) for ent in doc.ents])
Below are the entities extracted from our sample job description:
[("C", "SKILLS"),("#", "SKILLS"),(".NET Core", "SKILLS"),("database design", "SKILLS"),("usage", "SKILLS"),("NoSQL", "SKILLS"),("problem solving", "SKILLS"),("critical thinking", "SKILLS"),("Azure", "SKILLS"),("Bachelor", "DIPLOMA"),("'s", "DIPLOMA"),("Computer Science", "DIPLOMA_MAJOR"),("4 years experience with C# and .NET\n-", "EXPERIENCE"),("4 years overall experience in developing commercial software\n\n", "EXPERIENCE")]
Pretty impressive for only using 120 training documents! We were able to extract most of the skills, diploma, diploma major, and experience correctly.
With more training data, the model would certainly improve further and yield higher scores.
Conclusion:
With only a few lines of code, we have successfully trained a functional NER transformer model thanks to the amazing spaCy 3 library. Go ahead and try it out on your use case and please share your results. Note, you can use UBIAI annotation tool to label your data, we offer free 14 days trial.
As always, if you have any comment, please leave a note below or email at [email protected]!
Follow us on Twitter @UBIAI5
Image Source: Statistical Aid: A School of Statistics